Mozilla Web of Things: turning my home ventilation into a Web Thing
A while ago I’ve created a system to be able to control my home ventilation fan by using a 433mhz remote dimmer. In this post I will be using Project Things by Mozilla to create a ‘Web Thing’ out of that same home ventilation fan.
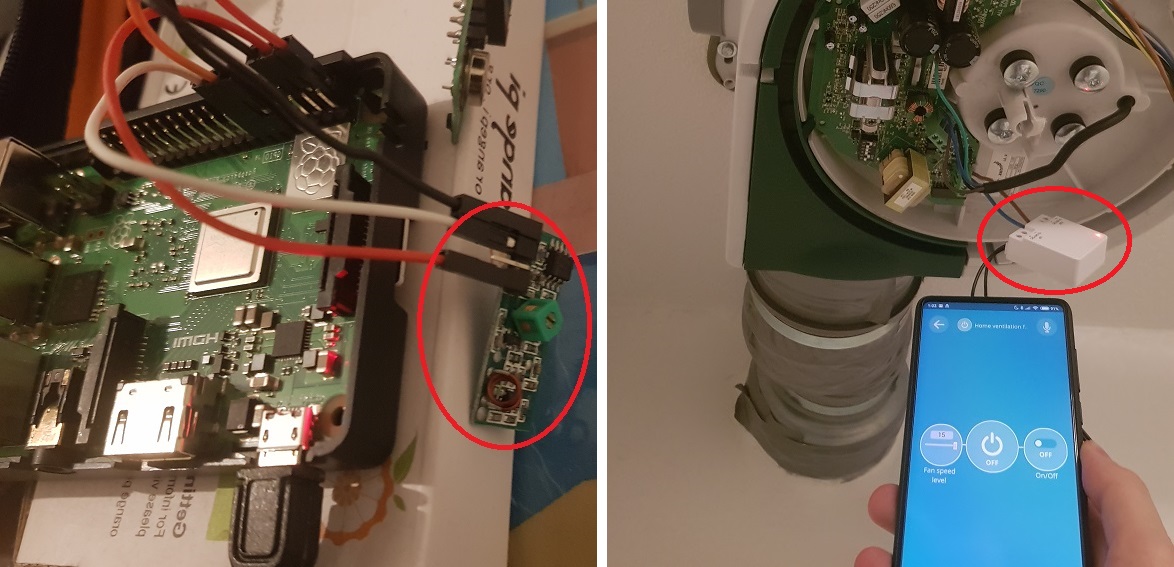
On the left, a raspberry pi with a 433mhz transmitter. On the right, the fan, the remote dimmer and a phone showing the Gateway Things UI (no worries, the wires go to a power adapter not my phone).
I want to be able to control my ‘Things’ easily and as I’m a web developer by day (and by night), I prefer to use the web technologies well known to me. The Web Thing API initiative tries to standardize the definition of a Web Thing and its properties, fortunately it already seems to support my (very basic) requirements!

An example of the Things Gateway UI displaying various Web Things that can be monitored and controlled.
The plan
I will to need set-up two essential items to get this Mozilla Web of Things running within my network. First I need a Things Gateway in order to monitor and control Web Things. Basically it’s a web application, running on my raspberry pi, that can be used to scan the network for Web Things. Once configured it can be used to interact with the Web Things, provided that they have defined any interaction.
Second, I need turn my fan into a Web Thing. This basically means that I will have to define the properties and behaviour of my fan. Afterwards it will be accessibly on my network by using web requests / web sockets. This, as well, will run on my raspberry pi as it is the only device I have with a 433mhz transmitter.
Step 1: Installing the gateway
Fortunately Mozilla provides instructions to set-up such a gateway on a raspberry pi. Since I didn’t want to reinstall my raspberry pi I’ve decided to check out the code and set up the gateway myself, using the installation instructions.
This went surprisingly smooth; within no-time I had a Things Gateway set up with a public URL provided by Mozilla. If you need any help with deciphering the installation instructions, feel free to send me a message.
If you need any help with this let me know, within minutes I had a Things Gateway set up with a public URL provided by Mozilla. Basically I followed the instructions and used the scripts in the gateway/image folder.

An empty gateway, next up - create a Web Thing!
Step 2: Turning the fan into a Web Thing
The second step is to create a Web Thing that exposes certain properties, in this case an on and off switch and a dim/level property. The fan has 16 different speed levels and can be turned off (this means we end up with 17 levels, as ‘off’ is the lowest setting). Turning the fan off actually sets it to ‘idle’, it’s mandatory for the fan to be running as that is needed to ventilate the house.
In my previous blog post I’ve already created some scripts that allow me to control the fan. On my raspberry I have a script called set-fan-level.sh, calling this script will turn on the fan and set it to a certain speed. For example ./set-level-fan.sh 15 turns on the fan on full speed and ./set-level-fan.sh 0 turns on the fan at the speed level just above ‘idle’.
In order to create a web thing I’ve used the webthing npm package. I’ve created a Web Thing with two properties, an OnOffProperty and a LevelProperty.
The LevelProperty determines the speed of the fan, and if I change the speed of the fan I immediately turn on the fan as well.
The OnOffProperty reads the value of the LevelProperty and turns on the fan by calling the set-fan-level.sh script, or it turns the fan off by calling the stop-fan.sh script.
Without further ado, here is the code:
import { runScript } from './run-script';
const { Property, Thing, Value } = require('webthing');
const path = require('path');

const startFanScript = path.resolve(__dirname, '../fan-scripts/set-level-fan.sh');
const stopFanScript = path.resolve(__dirname, '../fan-scripts/stop-fan.sh');
const onOffPropertyName = 'on';
const fanLevelPropertyName = 'level';

export class WebFanThing extends Thing {
    constructor() {
        super('Home ventilation fan', ['OnOffSwitch'], 'Home ventilation fan');
        this.addProperty(
            new Property(
                this,
                onOffPropertyName,
                new Value(false, (v: boolean) => {
                    console.log('On-State is now', v);
                    const levelProp = this.getProperty(fanLevelPropertyName);
                    if (v) {
                        runScript(startFanScript, [`${levelProp}`]);
                    } else {
                        runScript(stopFanScript);
                    }
                }),
                {
                    '@type': 'OnOffProperty',
                    label: 'On/Off',
                    type: 'boolean',
                    description: 'Whether the fan is turned on',
                }
            )
        );
        this.addProperty(
            new Property(
                this,
                fanLevelPropertyName,
                new Value(15, (v: number) => {
                    console.log('Fan level is now', v);

                    // Schedule 'turn fan on'
                    setTimeout(() => {
                        const onOffProp = this.findProperty(onOffPropertyName);
                        onOffProp.setValue(true);
                    }, 0);
                }),
                {
                    '@type': 'LevelProperty',
                    label: 'Fan speed level',
                    type: 'number',
                    description: 'The fan level from 0-15',
                    minimum: 0,
                    maximum: 15,
                }
            )
        );
    }
}
As you can see; the implementation is pretty straight forward. I’ve defined the fan as an OnOffSwitch, this allows me to switch it off easily from the Things Gateway UI. The LevelProperty can be set in the Web Thing ‘details’, and it ensures the OnOffProperty is set to true.
Here I add the Fan Web Thing to the Gateway and control it by turning it on and changing the level. Web Thing (debug) logging on the right.
But how does the gateway find the Web Thing? Of course this is no magic, you can use the webthing package to do most of the work for you. All you have to do is set up a WebThingServer with the kind of thing(s) you want to expose (single or multiple) and which port you want to use and you’re done:
const { SingleThing, WebThingServer } = require('webthing');
import { WebFanThing } from './webfan-thing';

function runServer() {
    const thing = new WebFanThing();

    // If adding more than one thing, use MultipleThings() with a name.
    // In the single thing case, the thing's name will be broadcast.
    const server = new WebThingServer(new SingleThing(thing), 8888);

    process.on('SIGINT', () => {
        server.stop();
        process.exit();
    });

    server.start();
    console.log('Web fan server started');
}

runServer();
As mentioned before, I’m running the code on my raspberry pi as well. It is the only device I have with a 433mhz transmitter connected to it and I need that to send messages to the dimmer connected to the fan. Once you run the code you will see the capabilities of your Web Thing by doing a GET request or browsing to the URL http://your-webthing-ip-address:8888.
{
  "name": "Home ventilation fan",
  "href": "\/",
  "@context": "https:\/\/iot.mozilla.org\/schemas",
  "@type": [
    "OnOffSwitch"
  ],
  "properties": {
    "on": {
      "@type": "OnOffProperty",
      "label": "On\/Off",
      "type": "boolean",
      "description": "Whether the fan is turned on",
      "href": "\/properties\/on"
    },
    "level": {
      "@type": "LevelProperty",
      "label": "Fan speed level",
      "type": "number",
      "description": "The fan level from 0-15",
      "minimum": 0,
      "maximum": 15,
      "href": "\/properties\/level"
    }
  },
  "actions": {},
  "events": {},
  "links": [
    {
      "rel": "properties",
      "href": "\/properties"
    },
    {
      "rel": "actions",
      "href": "\/actions"
    },
    {
      "rel": "events",
      "href": "\/events"
    },
    {
      "rel": "alternate",
      "href": "ws:\/\/your-webthing-ip-address:8888"
    }
  ],
  "description": "Home ventilation fan"
}
You can interact with the Web Thing by using normal REST operations against it, for example a GET on /properties/level gives me {"level":7}. If I want to change the level I can do a simple PUT and pass the new level as a body param (fiddler snippet):
PUT http://your-webthing-ip-address:8888/properties/level HTTP/1.1
User-Agent: Fiddler
Host: your-webthing-ip-address:8888
Content-Type: application/json; charset=utf-8
Content-Length: 12

{"level":15}
It returns a 200 OK and I hear the fan running on full speed!
HTTP/1.1 200 OK
X-Powered-By: Express
Date: Wed, 17 Oct 2018 22:47:43 GMT
....

{"level":15}

Conclusion
I hope I was able to show you how easy it is to wrap an existing (physical) device using the Web Things API. All I had to do was install the Things Gateway on my Raspberry pi and define a Web Thing for my home ventilation fan. The Things Gateway is accessible from within and from outside of my network and it provides a clean and simple PWA to control your Web Things with. If you’re interested in the code, you can find it here.